How To Build Your Own Bookcase: A Step-by-Step DIY Guide
Building your own bookcase is one of the most rewarding DIY projects you can tackle, whether you're a seasoned woodworker or just starting out. Picture this: a beautiful, custom-made bookcase that fits perfectly in your space, holds all your favorite books, and adds a touch of personal flair to your home. Who wouldn’t want that? Plus, it’s way cheaper than buying a pre-made one from the store, and you get the satisfaction of knowing you built it yourself. Now, let’s dive into how you can turn this dream into reality.
Before we get our hands dirty (or should I say, covered in sawdust?), let’s talk about why building your own bookcase is such a great idea. Not only does it save you money, but it also allows you to customize every aspect of the design. You can choose the wood, the size, the color, and even add special features like hidden compartments or adjustable shelves. It’s like creating a piece of furniture that’s tailor-made for you.
Now, if you're thinking, "But I've never done anything like this before!" don't worry. This guide is designed to walk you through every step of the process, from planning to finishing. By the end, you'll have a stunning bookcase that you can proudly show off to your friends and family. So grab a cup of coffee (or tea, if that's your thing), and let’s get started!
- P Diddy Rafting An Adventure Beyond Music
- How Does P Diddy Make Money Unveiling The Financial Empire Of Sean Combs
Why Building Your Own Bookcase is Worth It
Building your own bookcase might seem intimidating at first, but trust me, it’s totally worth it. First off, you save a ton of money compared to buying one from a store. Plus, when you build it yourself, you get to decide exactly how it looks and functions. No more settling for something that’s almost perfect but not quite right. You can make it as big or as small as you want, choose the perfect wood finish, and even add unique details that make it truly one-of-a-kind.
And let’s not forget the sense of accomplishment you’ll feel when you’re done. There’s nothing quite like standing back and admiring something you’ve created with your own two hands. It’s a confidence boost that will make you want to tackle even bigger DIY projects in the future.
So, if you're ready to take on this challenge, the next step is to gather all the tools and materials you’ll need. But don’t worry—we’ll cover that in detail in the next section. For now, just know that with a little patience and some elbow grease, you can build a bookcase that will last for years to come.
Gathering Tools and Materials
Before you start building, it’s important to make sure you have all the necessary tools and materials on hand. This will save you time and frustration later on. Here’s a list of the basics you’ll need:
- Lumber: You’ll need boards for the sides, shelves, and back of your bookcase. Pine or oak are popular choices because they’re durable and easy to work with.
- Screws: Wood screws are essential for assembling the bookcase. Choose a length that’s appropriate for the thickness of your wood.
- Wood Glue: This will help strengthen the joints and ensure your bookcase is sturdy.
- Sandpaper: Use this to smooth out any rough edges and give your bookcase a polished look.
- Paint or Stain: Depending on your preference, you can paint your bookcase or stain it to bring out the natural beauty of the wood.
As for tools, you’ll need a saw (a circular saw or handsaw will do), a drill, a screwdriver, a hammer, and a measuring tape. If you’re serious about woodworking, investing in a good quality miter saw can make cutting precise angles much easier. But if you’re just starting out, a handsaw and a little patience will do the trick.
Choosing the Right Wood
When it comes to choosing wood for your bookcase, there are a few things to consider. Hardwoods like oak and maple are more durable and have a beautiful grain pattern, but they can be more expensive. Softwoods like pine are cheaper and easier to work with, but they may not hold up as well over time. It really depends on your budget and how long you plan to keep the bookcase.
Also, think about the finish you want. If you’re planning to paint your bookcase, the type of wood matters less because the paint will cover any imperfections. But if you want to stain it, you’ll want to choose a wood with a nice grain pattern that will show through the stain.
Planning Your Bookcase Design
Once you’ve gathered your materials, it’s time to plan out the design of your bookcase. This is where the fun begins! Start by measuring the space where you want to place the bookcase. Take note of the height, width, and depth of the area so you can design a bookcase that fits perfectly.
Next, decide how many shelves you want and how far apart they should be. If you’re planning to store books of different sizes, you might want to make some shelves adjustable. This will give you more flexibility in how you use the space.
Don’t forget to think about the style you want. Do you want a modern, minimalist look, or something more traditional? Adding details like crown molding or decorative brackets can give your bookcase a unique touch.
Creating a Sketch or Blueprint
It’s always a good idea to create a sketch or blueprint of your bookcase before you start building. This will help you visualize the final product and make any necessary adjustments before you cut any wood. You can draw it by hand or use a software program if you’re tech-savvy.
Your sketch should include measurements for each piece of wood, as well as the placement of shelves and any additional features you want to include. This will serve as your roadmap throughout the building process.
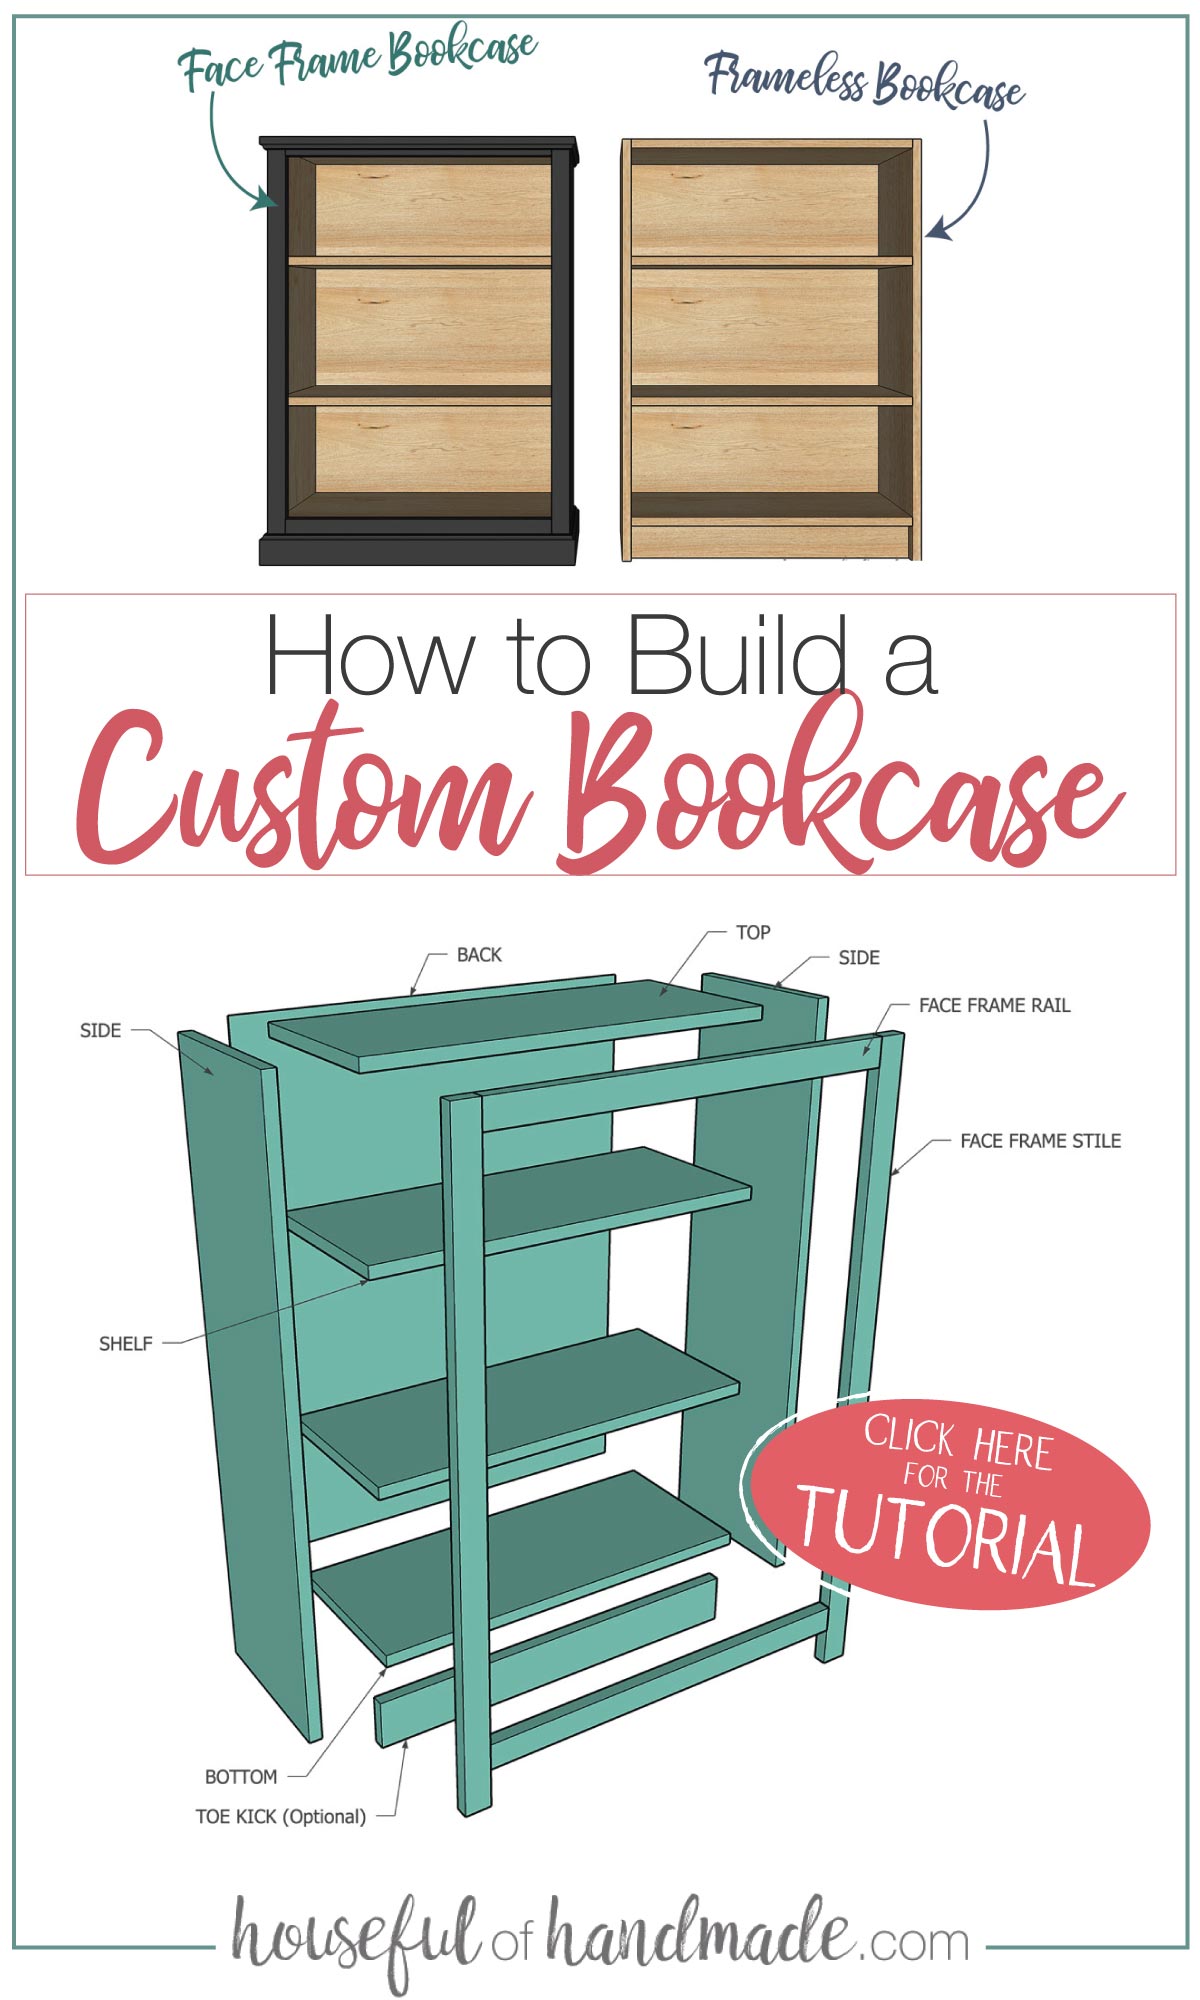
Step-by-Step Instructions for Building Your Bookcase
Now that you’ve planned out your design and gathered your materials, it’s time to start building. Here’s a step-by-step guide to help you through the process:
- Cut the Wood: Using your saw, cut the wood to the dimensions specified in your blueprint. Double-check your measurements before making each cut to avoid mistakes.
- Assemble the Frame: Start by assembling the sides and top/bottom pieces of the frame. Use wood glue and screws to secure the joints. Make sure everything is square and level as you go.
- Add the Shelves: Once the frame is assembled, attach the shelves. If you’re making them adjustable, install metal shelf standards and brackets to hold them in place.
- Attach the Back: Cut a piece of plywood or particleboard to fit the back of the bookcase. Attach it with nails or screws to add stability to the structure.
- Sand and Finish: Sand the entire bookcase to smooth out any rough edges. Then, apply your chosen paint or stain. Let it dry completely before moving on to the next step.
- Install the Bookcase: Carefully move your bookcase to its final location and secure it to the wall if necessary. This will prevent it from tipping over.
Tips for a Successful Build
Here are a few tips to help ensure your bookcase turns out exactly as you envisioned:
- Take your time and don’t rush the process. Rushing can lead to mistakes that are hard to fix later.
- Measure twice, cut once. This old woodworking adage is true for a reason. Double-checking your measurements will save you a lot of headaches.
- Use clamps to hold pieces together while the glue dries. This will help ensure strong, secure joints.
- Don’t be afraid to ask for help if you need it. Whether it’s lifting heavy pieces of wood or getting a second opinion on your design, having an extra set of hands can make a big difference.
Adding Personal Touches
One of the best things about building your own bookcase is that you can add personal touches that make it unique to you. Maybe you want to add a hidden compartment for storing valuables, or perhaps you’d like to incorporate lighting to highlight your favorite books. The possibilities are endless!
For example, you could install LED strip lights inside the bookcase to create a warm, inviting glow. Or, if you’re feeling adventurous, you could carve a design into the wood or add decorative trim to give it a more ornate look.
Customizing Your Bookcase
Here are a few ideas for customizing your bookcase:
- Paint the inside a different color than the outside for a pop of contrast.
- Install glass doors on the front to protect your books from dust.
- Add casters to the bottom so you can easily move the bookcase around your room.
Common Mistakes to Avoid
Even the most experienced woodworkers make mistakes from time to time. Here are a few common pitfalls to watch out for when building your bookcase:
- Not Measuring Carefully: As I mentioned earlier, taking accurate measurements is crucial. A small error can lead to big problems later on.
- Using the Wrong Tools: Make sure you’re using the right tools for the job. For example, don’t try to cut thick wood with a flimsy handsaw—it’ll only frustrate you.
- Skipping Sanding: Sanding might seem like a tedious task, but it’s essential for achieving a smooth, professional finish.
How to Fix Mistakes
If you do make a mistake, don’t panic. Most mistakes can be fixed with a little creativity. For example, if you accidentally cut a piece of wood too short, you can often salvage it by adding a piece of scrap wood to extend it. Or, if you get glue where you don’t want it, you can usually remove it with a damp cloth before it dries.
Finishing Touches
Once your bookcase is built, it’s time to add the finishing touches. This is where you can really make it shine. Start by sanding the entire piece one last time to ensure a smooth surface. Then, apply your chosen finish—whether it’s paint, stain, or varnish—and let it dry completely.
When the finish is dry, you can add any hardware you want, like handles or knobs. Finally, move your bookcase to its final location and start filling it with your favorite books, decor, and memories.
Maintaining Your Bookcase
To keep your bookcase looking its best, it’s important to maintain it properly. Dust it regularly with a soft cloth, and avoid using harsh chemicals that could damage the finish. If you notice any scratches or chips, touch them up with a matching wood filler or paint.
Conclusion
Building your own bookcase is a rewarding and fulfilling DIY project that anyone can tackle with the right guidance. By following this step-by-step guide, you can create a beautiful, custom-made bookcase that fits perfectly in your space and reflects your personal style. Remember, the key to success is taking your time, measuring carefully, and not being afraid to ask for help when you need it.
So what are you waiting for? Grab your tools, gather your materials, and start building your dream bookcase today. And when you’re done, don’t forget to share your masterpiece with the world. Whether it’s posting pictures on social media or inviting friends over for a tour, there’s nothing quite like showing off something you’ve created with your own hands. Happy building!
Table of Contents
- Why Building Your Own Bookcase is Worth It
- Gathering Tools and Materials
- Choosing the Right Wood
- Planning Your Bookcase Design
- Creating a Sketch or Blueprint
- Step-by-Step Instructions for Building Your Bookcase
- Tips for a Successful Build
- Adding Personal Touches
- Customizing Your Bookcase
- Common Mistakes to Avoid
- Finishing Touches
- Meek Mill And P Diddy A Deep Dive Into Their Relationship And Impact On Hiphop Culture
- What Is P Diddy Being Charged For Understanding The Recent Legal Issues
How To Build Your Own Bookcase A StepbyStep DIY Guide
How To Build Your Own Bookcase A StepbyStep DIY Guide
Build Your Own Bookcase Pattern DIY Any Size Custom Bookshelf Etsy
